【吃透Java手写】Spring(上)启动-扫描-依赖注入-初始化-后置处理器
- 1 准备工作
- 1.1 创建自己的Spring容器类
- 1.2 创建自己的配置类 @ComponentScan
- 1.3 @ComponentScan
- 1.3.1 @Retention
- 1.3.2 @Target
- 1.4 用户类UserService @Component
- 1.5 @Component
- 1.6 测试类
- 2 启动和扫描逻辑模拟实现
- 2.1 解析配置类-获取扫描路径
- 2.2 解析配置类-扫描
- 2.2.1 通过包名来获取类
- 2.2.2 判断是否为Bean对象
- 2.2.3 单例/原型Bean实现
- 2.2.3.1 单例池
- 2.2.3.2 BeanDefinition池
- 2.2.3.3 单例Bean实例化
- 2.2.3.4 原型Bean实例化
- 2.2.3.5 测试
- 3 依赖注入模拟实现
- 3.1 @Autowired
- 3.2 为UserService引入OrderService依赖
- 3.3 BeanNameAware接口
- 4 初始化机制模拟实现
- 4.1 InitializingBean接口
- 5 BeanPostProcessor模拟实现
- 5.1 BeanPostProcessor接口
- 5.2 具体实现类
- 5.3 Spring扫描时对BeanPostProcessor实现类处理
- 5.4 BeanPostProcessor实现类初始换前后处理
- 5.5 测试
1 准备工作
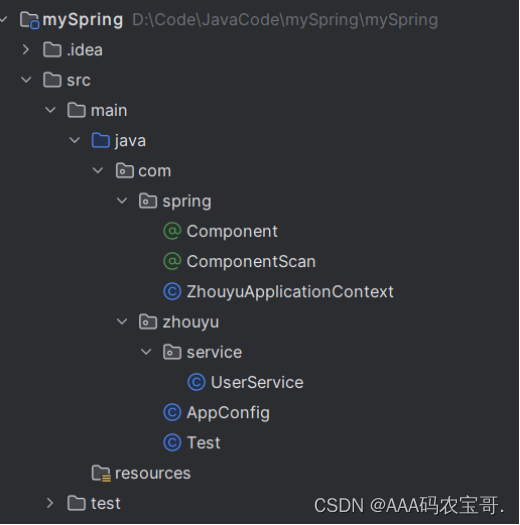
1.1 创建自己的Spring容器类
创建com.spring.ZhouyuApplicationContext
public class ZhouyuApplicationContext {
    private Class configClass;

    public ZhouyuApplicationContext(Class configClass) {
        this.configClass = configClass;
        //解析配置类
        //ComponentScan注解--->扫描路径--->扫描

    }

    public Object getBean(String beanName) {
        return null;
    }
}
public ZhouyuApplicationContext(Class configClass)用配置类来初始换容器public Object getBean(String beanName)获取bean方法- 获取到配置类会通过解析配置类来完成对容器的初始化->
//解析配置类,这里的解析,Spring只会解析Spring中提供的注解,对于自定义的注解是无法自动解析的
1.2 创建自己的配置类 @ComponentScan
创建com.zhouyu.AppConfig
import com.spring.ComponentScan;

@ComponentScan("com.zhouyu.service")
public class AppConfig {
}
配置类需要定义扫描路径,则需要创建@ComponentScan注解
@ComponentScan("com.zhouyu.service")定义扫描路径为"com.zhouyu.service"
1.3 @ComponentScan
@ComponentScan是Spring用于扫描路径的注解,所以在Spring目录下
@Retention(RetentionPolicy.RUNTIME)
@Target(ElementType.TYPE)
public @interface ComponentScan {
    String value() default "";
}
1.3.1 @Retention
-
@Retention(RetentionPolicy.RUNTIME)注解不仅被保存到class文件中,jvm加载class文件之后,仍然存在;1、RetentionPolicy.SOURCE:注解只保留在源文件,当Java文件编译成class文件的时候,注解被遗弃;
2、RetentionPolicy.CLASS:注解被保留到class文件,但jvm加载class文件时候被遗弃,这是默认的生命周期;
3、RetentionPolicy.RUNTIME:注解不仅被保存到class文件中,jvm加载class文件之后,仍然存在;
首先要明确生命周期长度 SOURCE < CLASS < RUNTIME ,所以前者能作用的地方后者一定也能作用。一般如果需要在运行时去动态获取注解信息,那只能用 RUNTIME 注解;如果要在编译时进行一些预处理操作,比如生成一些辅助代码(如 ButterKnife),就用 CLASS注解;如果只是做一些检查性的操作,比如 @Override 和 @SuppressWarnings,则可选用 SOURCE 注解。
1.3.2 @Target
@Target(ElementType.TYPE)可以用于类、接口和枚举类型。
@Target注解用于指定注解可以应用的程序元素类型,它有一个ElementType枚举类型的参数,可以取值为:
ElementType.TYPE:可以用于类、接口和枚举类型。
ElementType.FIELD:可以用于字段(包括枚举常量)。
ElementType.METHOD:可以用于方法。
ElementType.PARAMETER:可以用于方法的参数。
ElementType.CONSTRUCTOR:可以用于构造函数。
ElementType.LOCAL_VARIABLE:可以用于局部变量。
ElementType.ANNOTATION_TYPE:可以用于注解类型。
ElementType.PACKAGE:可以用于包。
ElementType.TYPE_PARAMETER:可以用于类型参数声明(Java 8新增)。
ElementType.TYPE_USE:可以用于使用类型的任何语句中(Java 8新增)。
String value() default ""定义扫描路径,默认值为空
1.4 用户类UserService @Component
创建com.zhouyu.service.UserService
@Component("userService")
public class UserService {
}
@Component("userService")定义Bean,value的值表示Bean的名字,如果不写的话Spring会解析你的类名,然后小写首字母当作Bean名
1.5 @Component
@Retention(RetentionPolicy.RUNTIME)
@Target(ElementType.TYPE)
public @interface Component {
    String value() default "";
}
规则与@ComponentScan类似
1.6 测试类
创建com.zhouyu.Test
public class Test {
    public static void main(String[] args) {
        ZhouyuApplicationContext context = new ZhouyuApplicationContext(AppConfig.class);
        Object userService = context.getBean("userService");
    }
}
2 启动和扫描逻辑模拟实现
2.1 解析配置类-获取扫描路径
在com.spring.ZhouyuApplicationContext中
public class ZhouyuApplicationContext {
    private Class configClass;

    public ZhouyuApplicationContext(Class configClass) {
        this.configClass = configClass;
        //解析配置类
        ComponentScan componentScanAnnotations = (ComponentScan)configClass.getDeclaredAnnotation(ComponentScan.class);
        //扫描路径
        String path= componentScanAnnotations.value();
        System.out.println("扫描路径:"+path);
    }

    public Object getBean(String beanName) {
        return null;
    }
}
configClass.getDeclaredAnnotation拿到注解,通过.value拿到注解的值
运行得到包名
扫描路径:com.zhouyu.service
2.2 解析配置类-扫描
当com.zhouyu.service下有很多类时,有些类是我们Spring不关心的类,我们Spring关心的是加了@Component注解的类,这样就把这些作为Bean然后放在容器中
2.2.1 通过包名来获取类
这里需要用到类加载器
- 引导类加载器 Bootstrap,加载属于JVM的一部分,由C++代码实现,负责加载
<JAVA_HOME\>\jre\lib路径下的核心类库,由于安全考虑只加载 包名 java、javax、sun开头的类。 - 扩展类加载器 ExtClassLoader,扩展类加载器的父加载器是
Bootstrap启动类加载器(注:不是继承关系)。扩展类加载器负责加载<JAVA_HOME>\jre\lib\ext目录下的类库。 - 系统类加载器 AppClassLoader,系统类加载器的父加载器是
ExtClassLoader扩展类加载器(注: 不是继承关系)。系统类加载器负责加载classpath环境变量所指定的类库,是用户自定义类的默认类加载器。
D:\Software\software_with_code\idea\jdk\jdk-17\bin\java.exe "-javaagent:D:\Software\software_with_code\idea\software\IntelliJ IDEA 2023.2\lib\idea_rt.jar=47035:D:\Software\software_with_code\idea\software\IntelliJ IDEA 2023.2\bin" -Dfile.encoding=UTF-8 -classpath D:\Code\JavaCode\mySpring\mySpring\target\classes com.zhouyu.Test
扫描路径:com.zhouyu.service
刚刚获取扫描路径时最后指定的classpath,说明运行的是系统类加载器AppClassLoader。classpath的路径是D:\Code\JavaCode\mySpring\mySpring\target\classes,所以获取类加载的相对路径就是这个。

public ZhouyuApplicationContext(Class configClass) {
    this.configClass = configClass;
    //解析配置类
    ComponentScan componentScanAnnotations = (ComponentScan)configClass.getDeclaredAnnotation(ComponentScan.class);
    //ComponentScan注解--->扫描路径--->扫描
    //扫描路径
    String path= componentScanAnnotations.value();
    System.out.println("扫描路径:"+path);
    //获取类加载器
    ClassLoader classLoader = ZhouyuApplicationContext.class.getClassLoader();
    URL resource =classLoader.getResource("com/zhouyu/service");
    File file=new File(resource.getFile());
    if(file.isDirectory()){
        File[] files=file.listFiles();
        for(File f:files){
            System.out.println(f);
        }
    }
}
输出
扫描路径:com.zhouyu.service
D:\Code\JavaCode\mySpring\mySpring\target\classes\com\zhouyu\service\UserService.class
D:\Code\JavaCode\mySpring\mySpring\target\classes\com\zhouyu\service\XxUtil.class
这样获取了类,也就能获取类上的注解了
public ZhouyuApplicationContext(Class configClass) {
    this.configClass = configClass;
    //解析配置类
    ComponentScan componentScanAnnotations = (ComponentScan)configClass.getDeclaredAnnotation(ComponentScan.class);
    //ComponentScan注解--->扫描路径--->扫描
    //扫描路径
    String path= componentScanAnnotations.value();
    System.out.println("扫描路径:"+path);
    //获取类加载器
    ClassLoader classLoader = ZhouyuApplicationContext.class.getClassLoader();
    URL resource =classLoader.getResource("com/zhouyu/service");
    File file=new File(resource.getFile());
    if(file.isDirectory()){
        File[] files=file.listFiles();
        for(File f:files){
            System.out.println(f);
            Class<?> aClass = classLoader.loadClass("xxx");
            if(aClass.isAnnotationPresent(Component.class)){
                //..
            }
        }
    }
}
但是我们获取到的类是编译好的
D:\Code\JavaCode\mySpring\mySpring\target\classes\com\zhouyu\service\UserService.class
D:\Code\JavaCode\mySpring\mySpring\target\classes\com\zhouyu\service\XxUtil.class
怎么才能加载原先的com.zhouyu.service.UserService这样的路径呢?这样就要将D:\Code\JavaCode\mySpring\mySpring\target\classes\com\zhouyu\service\UserService.class``转换为com.zhouyu.service.UserService,掐头去尾,把\换成.
String fileName=f.getAbsolutePath();
if(fileName.endsWith(".class")){
    String className = fileName.substring(fileName.indexOf("com"), fileName.indexOf(".class"));
    className = className.replace("\\", ".");
ZhouyuApplicationContext全部代码
- 先获取扫描路径(com.zhouyu.service)—>
- 转换为相对路径(com/zhouyu/service)—>
- 通过相对路径获取类加载器获取编译好的类—>
- 获取编译好的类的路径名(D:\Code\JavaCode\mySpring\mySpring\target\classes\com\zhouyu\service\UserService.class)—>
- 转换为可获取的类名(com.zhouyu.service.UserService)—>
- 判断是否有注解Component来决定是不是Bean对象
public ZhouyuApplicationContext(Class configClass) {
    this.configClass = configClass;
    //解析配置类
    ComponentScan componentScanAnnotations = (ComponentScan)configClass.getDeclaredAnnotation(ComponentScan.class);
    //ComponentScan注解--->扫描路径--->扫描
    //扫描路径
    String path= componentScanAnnotations.value();
    path = path.replace(".", "/");
    //System.out.println("扫描路径:"+path);
    //获取类加载器
    ClassLoader classLoader = ZhouyuApplicationContext.class.getClassLoader();
    URL resource =classLoader.getResource(path);
    File file=new File(resource.getFile());
    if(file.isDirectory()){
        File[] files=file.listFiles();
        for(File f:files){
            //System.out.println(f.getAbsolutePath());
            String fileName=f.getAbsolutePath();
            if(fileName.endsWith(".class")){
                String className = fileName.substring(fileName.indexOf("com"), fileName.indexOf(".class"));
                className = className.replace("\\", ".");
                try {
                    Class<?> aClass = classLoader.loadClass(className);
                    if(aClass.isAnnotationPresent(Component.class)){
                        //有Component注解表示这个类是一个Bean需要被Spring管理
                    }
                } catch (ClassNotFoundException e) {
                    throw new RuntimeException(e);
                }
            }
        }
    }
}
2.2.2 判断是否为Bean对象
在Spring中的Bean对象也分为单例Bean和原型Bean
@Component("userService")
public class UserService {
}
如果没有指定@Scope,则默认为单例Bean
@Scope取值:
singleton:此取值时表明容器中创建时只存在一个实例,所有引用此bean都是单一实例。prototype:每次获取一个不同的Bean对象
如果加上@Scope("prototype")则代表是原型Bean
@Component("userService")
@Scope("prototype")
public class UserService {
}
2.2.3 单例/原型Bean实现
2.2.3.1 单例池
底层有一个map对象,map<beanName,bean对象>,如果获取的相同的beanName,则通过单例池来获取相同的Bean对象
在com.spring.ZhouyuApplicationContext中实现单例池
//单例池
private ConcurrentHashMap<String,Object>singletonObjects=new ConcurrentHashMap<String,Object>();
-
HashMap
HashMap是线程不安全的,因为HashMap中操作都没有加锁,因此在多线程环境下会导致数据覆盖之类的问题,所以,在多线程中使用HashMap是会抛出异常的。 -
HashTable
HashTable是线程安全的,但是HashTable只是单纯的在put()方法上加上synchronized。保证插入时阻塞其他线程的插入操作。虽然安全,但因为设计简单,所以性能低下。 -
ConcurrentHashMap
ConcurrentHashMap是线程安全的,ConcurrentHashMap并非锁住整个方法,而是通过原子操作和局部加锁的方法保证了多线程的线程安全,且尽可能减少了性能损耗。
在获取Component注解后,判断是否为单例Bean,如果是,就需要生成Bean对象然后放入单例池中。
2.2.3.2 BeanDefinition池
在Spring中如果要getBean,拿到beanName则需要每次都要解析Bean对象的注解,这样相当麻烦,因此在Spring中,统一为解析Bean时生成BeanDefinition
生成com.spring.BeanDefinition
public class BeanDefinition {
    //名字
    private Class clazz;
    //作用域
    private String scope;
    public Class getClazz() {
        return clazz;
    }
    public void setClazz(Class clazz) {
        this.clazz = clazz;
    }
    public String getScope() {
        return scope;
    }
    public void setScope(String scope) {
        this.scope = scope;
    }
}
扫描Bean时如果有Component注解就要创建BeanDefinition对象,再根据是否有Scope填充相应BeanDefinition对象的属性
if(aClass.isAnnotationPresent(Component.class)){
    //有Component注解表示这个类是一个Bean需要被Spring管理
    ComponentScan componentAnnotations = aClass.getDeclaredAnnotation(ComponentScan.class);
    String beanName = componentAnnotations.value();
    BeanDefinition beanDefinition = new BeanDefinition();
    beanDefinition.setClazz(aClass);
    if(aClass.isAnnotationPresent(Scope.class)){
        //原型Bean
        Scope aClassDeclaredAnnotation = aClass.getDeclaredAnnotation(Scope.class);
        beanDefinition.setScope(aClassDeclaredAnnotation.value());
    }else{
        //单例Bean
        beanDefinition.setScope("singleton");
    }
    beanDefinitionMap.put(beanName,beanDefinition);


}
2.2.3.3 单例Bean实例化
Spring启动时就要完成单例Bean实例化
在完成扫描后,要对单例池中的实例进行实例化,将以前的方法抽成一个方法scan
public ZhouyuApplicationContext(Class configClass) {
        this.configClass = configClass;
        //解析配置类
        scan(configClass);
        //针对单例池中的Bean要在Spring启动的时候进行实例化
        for(Map.Entry<String,BeanDefinition> entry:beanDefinitionMap.entrySet()){
            String beanName = entry.getKey();
            BeanDefinition beanDefinition = entry.getValue();
            if(beanDefinition.getScope().equals("singleton")){
                //创建Bean
                Object bean = createBean(beanDefinition);
                singletonObjects.put(beanName,bean);
            }
        }
    }
2.2.3.4 原型Bean实例化
在获取bean方法时,获取对应的BeanDefinition,如果是单例bean,则从单例池直接返回,如果不是则需要创建bean
public Object getBean(String beanName) {
    if (beanDefinitionMap.containsKey(beanName)) {
        BeanDefinition beanDefinition = beanDefinitionMap.get(beanName);
        if (beanDefinition.getScope().equals("singleton")) {
            //单例Bean
            Object o = singletonObjects.get(beanName);
            return o;
        } else {
            //原型Bean
            return createBean(beanDefinition);
        }
    } else {
        throw new RuntimeException("Not found [" + beanName + "] BeanDefinition");
    }
}
private Object createBean(BeanDefinition beanDefinition) {
    Class clazz = beanDefinition.getClazz();
    try {
        Object o = clazz.getDeclaredConstructor().newInstance();
        return o;
    } catch (InstantiationException e) {
        throw new RuntimeException(e);
    } catch (IllegalAccessException e) {
        throw new RuntimeException(e);
    } catch (InvocationTargetException e) {
        throw new RuntimeException(e);
    } catch (NoSuchMethodException e) {
        throw new RuntimeException(e);
    }
}
通过beanDefinition.getClazz().getDeclaredConstructor().newInstance()获取实例。
2.2.3.5 测试
public class Test {
    public static void main(String[] args) {
        ZhouyuApplicationContext context = new ZhouyuApplicationContext(AppConfig.class);
        Object userService = context.getBean("userService");
        Object userService1 = context.getBean("userService");
        Object userService2 = context.getBean("userService");
        System.out.println(userService);
        System.out.println(userService1);
        System.out.println(userService2);
    }
}
userService是一个原型Bean,可以看出每回获取的Bean对象地址都不同
com.zhouyu.service.UserService@2e5d6d97
com.zhouyu.service.UserService@238e0d81
com.zhouyu.service.UserService@31221be2
如果去掉@Scope("prototype")
@Component("userService")
//@Scope("prototype")
public class UserService {
}
输出
com.zhouyu.service.UserService@7daf6ecc
com.zhouyu.service.UserService@7daf6ecc
com.zhouyu.service.UserService@7daf6ecc
则全是单例bean
3 依赖注入模拟实现
3.1 @Autowired
创建com.spring.Autowired
@Retention(RetentionPolicy.RUNTIME)
@Target({ElementType.METHOD, ElementType.FIELD})
public @interface Autowired {
}
3.2 为UserService引入OrderService依赖
创建com.zhouyu.service.OrderService
@Component("orderService")
public class OrderService {
}
引入依赖
@Component("userService")
//@Scope("prototype")
public class UserService {
    @Autowired
    private OrderService orderService;

    public void test() {
        System.out.println(orderService);
    }
}
这样引入test方法
public class Test {
    public static void main(String[] args) {
        ZhouyuApplicationContext context = new ZhouyuApplicationContext(AppConfig.class);
        UserService userService = (UserService)context.getBean("userService");
        userService.test();
    }
}
在main中调用userService.test()则为空,因为依赖注入后并没有任何操作
null
一般来说我们依赖注入后,Spring就应该为我们赋好值了。
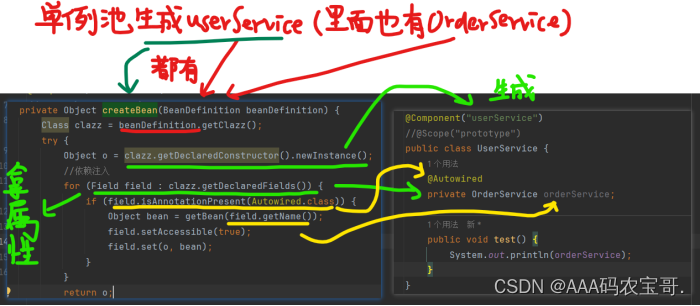
因此我们需要在创建Bean是准备好这一切。在com.spring.ZhouyuApplicationContext#createBean中
Class clazz = beanDefinition.getClazz();
try {
    Object o = clazz.getDeclaredConstructor().newInstance();
    //依赖注入
    for (Field field : clazz.getDeclaredFields()) {
        if (field.isAnnotationPresent(Autowired.class)) {
            Object bean = getBean(field.getName());
            if(bean==null) {
                throw new RuntimeException("Not found [" + field.getName() + "] BeanDefinition");
            }
            field.setAccessible(true);
            field.set(o, bean);
        }
    }
    return o;
}
field.setAccessible(true):设置了setAccessible为true之后,就能编辑final变量以及访问private变量。
重新测试userService.test(),得到
com.zhouyu.service.OrderService@433c675d
3.3 BeanNameAware接口
BeanNameAware 主要用于获取在 Spring 容器中配置的 Bean 名称,使得 Bean 能够获取自身在容器中的标识。
创建com.spring.BeanNameAware
public interface BeanNameAware {
    void setBeanName(String name);
}
就可以在UserService中实现这个接口,在创建Bean时就可以添加beanName
@Component("userService")
//@Scope("prototype")
public class UserService implements BeanNameAware {
    @Autowired
    private OrderService orderService;
    private String beanName;

    @Override
    public void setBeanName(String name) {
        beanName = name;
    }
    public void test() {
        System.out.println(orderService);
        System.out.println("userService beanName: " + beanName);
    }
}
在com.spring.ZhouyuApplicationContext#createBean中
private Object createBean(String beanName,BeanDefinition beanDefinition) {
    Class clazz = beanDefinition.getClazz();
    try {
        Object o = clazz.getDeclaredConstructor().newInstance();
        //依赖注入
        for (Field field : clazz.getDeclaredFields()) {
            if (field.isAnnotationPresent(Autowired.class)) {
                Object bean = getBean(field.getName());
                if(bean==null) {
                    throw new RuntimeException("Not found [" + field.getName() + "] BeanDefinition");
                }
                field.setAccessible(true);
                field.set(o, bean);
            }
        }
        if(o instanceof BeanNameAware){
            ((BeanNameAware) o).setBeanName(beanName);
        }
        return o;
    } catch (InstantiationException e) {
        throw new RuntimeException(e);
    } catch (IllegalAccessException e) {
        throw new RuntimeException(e);
    } catch (InvocationTargetException e) {
        throw new RuntimeException(e);
    } catch (NoSuchMethodException e) {
        throw new RuntimeException(e);
    }
}
o instanceof BeanNameAware判断是否实现BeanNameAware,如果实现了就把Object类转为其实现的BeanNameAware的接口类,并调用其setBeanName完成赋值。
4 初始化机制模拟实现
4.1 InitializingBean接口
InitializingBean是Spring提供的拓展性接口,InitializingBean接口为bean提供了属性初始化后的处理方法,它只有一个afterPropertiesSet方法,凡是继承该接口的类,在bean的属性初始化后都会执行该方法。
创建com.spring.InitializingBean
public interface InitializingBean {
    void afterPropertiesSet() throws Exception;
}
UserService实现InitializingBean接口
@Component("userService")
//@Scope("prototype")
public class UserService implements InitializingBean {
    @Autowired
    private OrderService orderService;
        @Override
    public void afterPropertiesSet() throws Exception {
        System.out.println("初始化方法");
    }
	//InitializingBean模拟实现
    public void test() {
        System.out.println(orderService);
        //System.out.println("userService beanName: " + beanName);
    }
}
在其创建bean时,对是否实现InitializingBean接口进行判断,在com.spring.ZhouyuApplicationContext#createBean中
//初始化方法
if(o instanceof InitializingBean){
    ((InitializingBean) o).afterPropertiesSet();
}
private Object createBean(String beanName,BeanDefinition beanDefinition) {
    Class clazz = beanDefinition.getClazz();
    try {
        Object o = clazz.getDeclaredConstructor().newInstance();
        //依赖注入
        for (Field field : clazz.getDeclaredFields()) {
            if (field.isAnnotationPresent(Autowired.class)) {
                Object bean = getBean(field.getName());
                if(bean==null) {
                    throw new RuntimeException("Not found [" + field.getName() + "] BeanDefinition");
                }
                field.setAccessible(true);
                field.set(o, bean);
            }
        }
        //Aware回调
        if(o instanceof BeanNameAware){
            ((BeanNameAware) o).setBeanName(beanName);
        }
        //初始化方法
        if(o instanceof InitializingBean){
            ((InitializingBean) o).afterPropertiesSet();
        }

        return o;
    } catch (InstantiationException e) {
        throw new RuntimeException(e);
    } catch (IllegalAccessException e) {
        throw new RuntimeException(e);
    } catch (InvocationTargetException e) {
        throw new RuntimeException(e);
    } catch (NoSuchMethodException e) {
        throw new RuntimeException(e);
    } catch (Exception e) {
        throw new RuntimeException(e);
    }
}
5 BeanPostProcessor模拟实现
该接口我们也叫后置处理器,作用是在Bean对象在实例化和依赖注入完毕后,在显示调用初始化方法的前后添加我们自己的逻辑。
注意是Bean实例化完毕后及依赖注入完成后触发的。
5.1 BeanPostProcessor接口
创建com.spring.BeanPostProcessor接口
public interface BeanPostProcessor {
    Object postProcessBeforeInitialization(Object bean, String beanName) throws Exception;

    Object postProcessAfterInitialization(Object bean, String beanName) throws Exception;
}
5.2 具体实现类
创建com.zhouyu.service.ZhouyuBeanPostProcessor实现BeanPostProcessor接口,并且用@Component交给Spring管理
@Component("zhouyuBeanPostProcessor")
public class ZhouyuBeanPostProcessor implements BeanPostProcessor {
    @Override
    public Object postProcessBeforeInitialization(Object bean, String beanName) throws Exception {
        System.out.println(beanName+"初始化方法之前");
        if(beanName.equals("userService")) {
            System.out.println("userService初始化方法之前");
        }
        return bean;
    }

    @Override
    public Object postProcessAfterInitialization(Object bean, String beanName) throws Exception {
        System.out.println(beanName+"初始化方法之后");
        if(beanName.equals("userService")) {
            System.out.println("userService初始化方法之后");
        }
        return bean;
    }
}
5.3 Spring扫描时对BeanPostProcessor实现类处理
因为ZhouyuBeanPostProcessor对实例方法前后都进行处理,所以需要在扫描时对实现BeanPostProcessor的类进行处理
要保证BeanPostProcessor接口的实现类率先被实例化,扫描顺序无所谓。
在com.spring.ZhouyuApplicationContext中用一个List来存放BeanPostProcessor接口的实现类
private List<BeanPostProcessor> beanPostProcessorsList=new ArrayList<>();
在com.spring.ZhouyuApplicationContext#scan中,对于判断这个类是否实现BeanPostProcessor接口,不能使用instanceof BeanPostProcessor因为该实现类还未被实例化。
所以需要使用BeanPostProcessor.class.isAssignableFrom(aClass)判断是否实现BeanPostProcessor接口
再调用aClass.getDeclaredConstructor().newInstance()进行实例化再放入List中
try {
    Class<?> aClass = classLoader.loadClass(className);
    if(aClass.isAnnotationPresent(Component.class)){
        //判断是否实现了BeanPostProcessor接口
        if(BeanPostProcessor.class.isAssignableFrom(aClass)){
            BeanPostProcessor instance = (BeanPostProcessor) aClass.getDeclaredConstructor().newInstance();
            beanPostProcessorsList.add(instance);
        }

        //有Component注解表示这个类是一个Bean需要被Spring管理
        Component componentAnnotations = aClass.getDeclaredAnnotation(Component.class);
        String beanName = componentAnnotations.value();
        BeanDefinition beanDefinition = new BeanDefinition();
        beanDefinition.setClazz(aClass);
        if(aClass.isAnnotationPresent(Scope.class)){
            //原型Bean
            Scope aClassDeclaredAnnotation = aClass.getDeclaredAnnotation(Scope.class);
            beanDefinition.setScope(aClassDeclaredAnnotation.value());
        }else{
            //单例Bean
            beanDefinition.setScope("singleton");
        }
        beanDefinitionMap.put(beanName,beanDefinition);
    }
}
这里在扫描到BeanPostProcessor接口创建了一次实例,在扫描Component注解又单例实例化了一次,有些不严谨。
Spring源码是使用createBean进行创建原型的,这也就可以在实现类中支持一些@Autowired的其他操作。这里只提供一种解决方法。
5.4 BeanPostProcessor实现类初始换前后处理
因为BeanPostProcessor是对初始化前后进行操作的,所以需要在对其他Bean对象创建时的初始化方法时进行处理
在com.spring.ZhouyuApplicationContext#createBean中
//BeanPostProcessor初始化方法之前
for(BeanPostProcessor beanPostProcessor:beanPostProcessorsList){
    o = beanPostProcessor.postProcessBeforeInitialization(o,beanName);
}
//初始化方法
if(o instanceof InitializingBean){
    ((InitializingBean) o).afterPropertiesSet();
}
//BeanPostProcessor初始化方法之后
for(BeanPostProcessor beanPostProcessor:beanPostProcessorsList){
    o = beanPostProcessor.postProcessAfterInitialization(o,beanName);
}
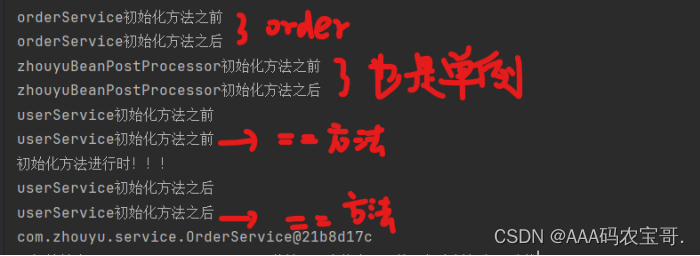
5.5 测试